Contents...
RAID – or “Redundant Array of Independent Disks” – is a strategy for data storage used on most server setups. Understanding how RAID works, how it can help you meet the needs of your business or organization, and understanding differences between RAID levels is important before setting up your server.
The disks are connected together to make a logical volume. It offers an excellent performance and this performance will vary depending on the RAID level. The two types of RAID are hardware RAID and software RAID.
In this article I will show you how to configure RAID 0 on CentOS 7.
RAID Levels
- RAID 0 : Striping
- RAID 1 : Mirroring
- RAID 5 : Striping and Parity
- RAID 6 : Striping with Double Parity
- RAID 10: Combining Mirroring and Striping
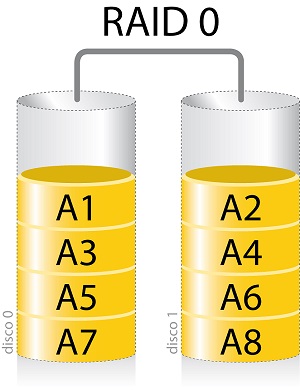
RAID Level 0 – Striping
In RAID 0 data are split up into blocks that get written across all the drive in the array. Using multiple disks at the same time this offers superior I/O performance. RAID 0 consists of striping, without mirroring or parity. The capacity of a RAID 0 volume is the sum of the capacities of the disks in the set, the same as with a spanned volume. To configure RAID 0, a minimum of two hard disks are required.
RAID Level 0 – Advantages
- RAID 0 offers great performance, both in read and write operations. There is no overhead caused by parity controls.
- All storage capacity is used, there is no overhead.
- The technology is easy to implement.
RAID Level 0 – Disadvantages
RAID 0 is not fault-tolerant. If one drive fails, all data in the RAID 0 array are lost. It should not be used for mission-critical systems.
RAID Level 0 – Ideal Use
RAID 0 is ideal for non‐critical storage of data that have to be read/written at a high speed, such as on an image retouching or video editing station.
If you want to use RAID 0 purely to combine the storage capacity of twee drives in a single volume, consider mounting one drive in the folder path of the other drive. This is supported in Linux, OS X as well as Windows and has the advantage that a single drive failure has no impact on the data of the second disk or SSD drive.
RAID 0 Configuration
To configure RAID 0 first of all you have to install the mdadm package which is a RAID managing tool in the target system. Run the below command to install the mdadm.
# yum install mdadm -y
Loaded plugins: fastestmirror, langpacks
Loading mirror speeds from cached hostfile
* base: centos.myfahim.com
* extras: centos.myfahim.com
* updates: mirror.ehost.vn
....
...
Verifying : mdadm-3.2.6-31.el7.x86_64 2/2
Updated:
mdadm.x86_64 0:4.0-5.el7
Complete
After installing mdadm package check if the device is available to configure RAID by typing below command:
# lsblk

NAME MAJ:MIN RM SIZE RO TYPE MOUNTPOINT
sda 8:0 0 30G 0 disk
sda1 8:1 0 500M 0 part /boot
sda2 8:2 0 14.7G 0 part /
sda3 8:3 0 2.5G 0 part [SWAP]
sdb 8:16 0 10G 0 disk
sdc 8:32 0 10G 0 disk
You can see the disk is available create a partitioning. Now create the partition for two disk by typing below command:
# fdisk /dev/sdb

Command (m for help): n
Partition type:
p primary (0 primary, 0 extended, 4 free)
e extended
Select (default p): p
Partition number (1-4, default 1): 1
First sector (2048-20971519, default 2048):
Using default value 2048
Last sector, +sectors or +size{K,M,G} (2048-20971519, default 20971519): +5G
Partition 1 of type Linux and of size 5 GiB is set

Command (m for help): t
Selected partition 1
Hex code (type L to list all codes): fd
Command (m for help): p
Note : Run the above command to create another partition and select the partition type “fd” which is Linux RAID Autodetect assigned to the partition.
Check the block details, Execute the following command to check it. The output shown below states that the disks have no previous RAID partition in the target system.
# mdadm -E /dev/sd[b-c]1
mdadm: No md superblock detected on /dev/sdb1.
mdadm: No md superblock detected on /dev/sdc1.
Create md device and select the RAID Level 0 as shown below:
# mdadm --create /dev/md0 --level=stripe --raid-devices=2 /dev/sd[b-c]1
mdadm: Defaulting to version 1.2 metadata
mdadm: array /dev/md0 started.
md device RAID level 0 create successfully. Now check the status of RAID level by typing below command:
# mdadm -E /dev/sd[b-c]1
You can also verify the status of RAID level by executing the following cat command as shown below.
# cat /proc/mdstat
To verify the md device status, run the following command.
# mdadm --detail /dev/md0
Now run the mkfs command to create a filesystem for md device:
# mkfs.ext4 /dev/md0
Mount permanently md device using blkid command and copy the UUID number. Edit the fstab file using vim editor and enter the copied UUID number in the file like below:
# mkdir /mnt/raid0
# blkid /dev/md0
/dev/md0: UUID= 1de8a17f-bdab-4cf4-9811-fd92af3e9188" TYPE= "ext4"

# vim /etc/fstab
UUID=1de8a17f-bdab-4cf4-9811-fd92af3e9188 /mnt/raid0 ext4 defaults 0 0
The device is mounted successfully and to verify the status of the device, run the following set of commands.
# mount -av
# df -h
Filesystem Size Used Avail Use% Mounted on
/dev/sda2 15G 4.4G 11G 30% /
devtmpfs 741M 0 741M 0% /dev
tmpfs 749M 140K 749M 1% /dev/shm
tmpfs 749M 8.9M 741M 2% /run
/dev/sda1 497M 116M 382M 24% /boot
/dev/md0 5.0G 37M 4.9G 1% /mnt/raid0
If you find this tutorial helpful please share with your friends to keep it alive. For more helpful topic browse my website www.looklinux.com. To become an author at LookLinux Submit Article. Stay connected to Facebook.
Leave a Comment