Contents...
As a Linux Administrator sometime you are required to setup a environment where you can run multiple website on different PHP version on single web server.
In this article I will show you how you can setup multiple website with different PHP version with Nginx web server in CentOS and RHEL 7 using LEMP.
Prerequisites
1. CentOS 7 and RHEL 7 with minimal installation.
2. Nginx Web Server.
3. PHP 7.1 (Default) and PHP 5.6
4. MariaDB Database Server.
Run Multiple Websites with Different PHP Version in Nginx
Follow the below steps to run multiple website with different PHP version in Nginx.
Install EPEL and REMI Rrepository
First of all install EPEL and REMI repository on your system which provides the latest versions of the PHP stack.
# yum install https://dl.fedoraproject.org/pub/epel/epel-release-latest-7.noarch.rpm
# yum install http://rpms.remirepo.net/enterprise/remi-release-7.rpm
Install yum-utils package which provide you yum-config-manager command, which is used to enable or disable yum repository on the system.
# yum install yum-utils
# subscription-manager repos --enable=rhel-7-server-optional-rpms
Install Nginx
Now install Nginx web server, you can add the Nginx repository from its official website or create a file nginx.repo in /etc/yum.repos.d/ location and add the below lines.
# vim /etc/yum.repos.d/nginx.repo
Add the below lines to file as per your distribution.
############# On CentOS 7 ############
[nginx]
name=nginx repo
baseurl=http://nginx.org/packages/centos/7/$basearch/
gpgcheck=0
enabled=1
########### On RHEL 7 ###############
[nginx]
name=nginx repo
baseurl=http://nginx.org/packages/rhel/7.x/$basearch/
gpgcheck=0
enabled=1
After adding the Nginx repo, next install Nginx web server using yum command.
# yum install nginx
Install MariaDB Database
Next install latest MariaDB version on your system. To install MariaDB database you need to create a file called “mariadb.repo” in /etc/yum.repos.d/ location.
# vim /etc/yum.repos.d/mariadb.repo
Add the below lines to file.
############ On CentOS 7 ###################
[mariadb]
name = MariaDB
baseurl = http://yum.mariadb.org/10.2/centos7-amd64
gpgkey=https://yum.mariadb.org/RPM-GPG-KEY-MariaDB
gpgcheck=1
############# On RHEL 7 ##########################
[mariadb]
name = MariaDB
baseurl = http://yum.mariadb.org/10.2/rhel7-amd64
gpgkey=https://yum.mariadb.org/RPM-GPG-KEY-MariaDB
gpgcheck=1
After adding the MariaDB repo, now install MariaDB using yum command.
# yum install MariaDB-client MariaDB-server
Next, run the musql_secure_installation to set the root password, disable remote root user login, remove anonymous-user account and test database etc.
# mysql_secure_installation
Install Multiple PHP Version
Now install multiple PHP version on your system use yum-config-manager command to install multiple version of PHP along with required modules as shown below.
For Install PHP 7.1 Version
# yum-config-manager --enable remi-php71  [Default]
# yum install php php-common php-fpm
# yum install php-mysql php-pecl-memcache php-pecl-memcached php-gd php-mbstring php-mcrypt php-xml php-pecl-apc php-cli php-pear php-pdo
For Install PHP 5.6 Version
# yum install php56 php56-php-common php56-php-fpm
# yum install php56-php-mysql php56-php-pecl-memcache php56-php-pecl-memcached php56-php-gd php56-php-mbstring php56-php-mcrypt php56-php-xml php56-php-pecl-apc php56-php-cli php56-php-pear php56-php-pdo
After PHP installed on your system follow the below command to check the default version of PHP.
# php -v
Configure PHP-FPM and PHP56-PHP-FPM
Now lets configure different version of PHP-FPM that Nginx will work with. Define the user and group of the FastCGI processes and ports to listen.
Edit the below configuration files.
/etc/php-fpm/www.conf – PHP-FPM (default 7.1)
/opt/remi/php56/root/etc/php-fpm.d/www.conf – PHP56-PHP-FPM
Edit the below files and set the user and group of FastCGI processes.
# vim /etc/php-fpm.d/www.conf   [PHP 7.1]
# vim /opt/remi/php56/root/etc/php-fpm.d/www.conf  [PHP 5.6]
Change the default value from apache to nginx as shown below.
listen = 127.0.0.1:9000	[php-fpm]
listen = 127.0.0.1:9001	[php56-php-fpm]
Now start the Nginx, MariaDB and PHP-FPM and set to start at boot time.
# systemctl enable nginx
# systemctl start nginx

# systemctl enable mariadb
# systemctl start mariadb
############### PHP 7.1 #####################
# systemctl enable php-fpm
# systemctl start php-fpm
############### PHP 5.6 #####################
# systemctl enable php56-fpm
# systemctl start php56-php-fpm
Setup Websites
Now create the directories for your websites under /var/www/html/.
################## Website 1 #################
# mkdir -p /var/www/html/example1.com/
# mkdir -p /var/www/html/example2.com/
Set the ownership and permissions on created directories.
########### Website 1 #######################
# chown -R root:nginx /var/www/html/example1.com/
# chmod -R 755 /var/www/html/example1.com/
############ Website 2 ####################
# chown -R root:nginx /var/www/html/example2.com/
# chmod -R 755 /var/www/html/example2.com/
Setup Nginx Server Block
Now configure your Nginx server block files which is located in /etc/nginx/conf.d/.
Create configuration file as shown below.
For Website 1
# vim /etc/nginx/conf.d/example1.com.conf

server {
        listen 80;
        server_name example1.com www.example1.com;

        root   /var/www/html/example1.com/;
        index index.php index.html index.htm;

        #charset koi8-r;
        access_log /var/log/nginx/example1.com/example1_access_log;
        error_log   /var/log/nginx/example1.com/example1_error_log   error;

       location / {
                try_files $uri $uri/ /index.php?$query_string;
        }

       # pass the PHP scripts to FastCGI server listening on 127.0.0.1:9000
        location ~ \.php$ {

                root    /var/www/html/example1.com/;
                fastcgi_pass   127.0.0.1:9000;	#set port for php-fpm to listen on
                fastcgi_index  index.php;
                fastcgi_param  SCRIPT_FILENAME  $document_root$fastcgi_script_name;
                include         fastcgi_params;
                include /etc/nginx/fastcgi_params;

        }
}
For Website 2
# vim /etc/nginx/conf.d/example2.com.conf

server {
        listen 80;
        server_name example2.com www.example2.com;

        root    /var/www/html/example2.com/;
        index index.php index.html index.htm;

        #charset koi8-r;
        access_log /var/log/nginx/example2.com/example2_access_log;
        error_log  /var/log/nginx/example2.com/example2_error_log   error;

       location / {
                try_files $uri $uri/ /index.php?$query_string;
        }

       # pass the PHP scripts to FastCGI server listening on 127.0.0.1:9000
        location ~ \.php$ {

                root    /var/www/html/example2.com/;
                fastcgi_pass   127.0.0.1:9001;	#set port for php56-php-fpm to listen on
	        fastcgi_index  index.php;
                fastcgi_param  SCRIPT_FILENAME  $document_root$fastcgi_script_name;
                include         fastcgi_params;
                include /etc/nginx/fastcgi_params;

        }
}
Please make sure below line should be added in the http block in /etc/nginx/nginx.conf.
include /etc/nginx/conf.d/*.conf;
Finally create basic phpinfo page scripts in the document root directory of your website to verify the PHP version.
# echo "" > /var/www/html/example1.com/info.php
# echo "" > /var/www/html/example2.com/info.php
Restart the Nginx, PHP-FPM and PHP56-PHP-FPM to apply the all changes you have mode above. But before restarting mention service check the Nginx configuration file for any syntax error before doing anything.
# nginx -t
# systemctl restart nginx php-fpm php56-php-fpm
Last thing to do, If your server is running locally you will need to edit local DNS using /etc/hosts file as shown below.
# vim /etc/hosts
192.168.0.5  example1.com   example1
192.168.0.5  example2.com   example2
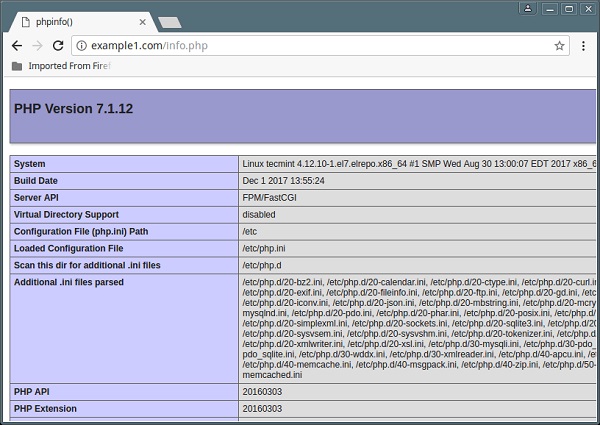
Now open your web browser and type the below URL to verify the PHP version.
http://example1.com/info.php
http://example2.com/info.php
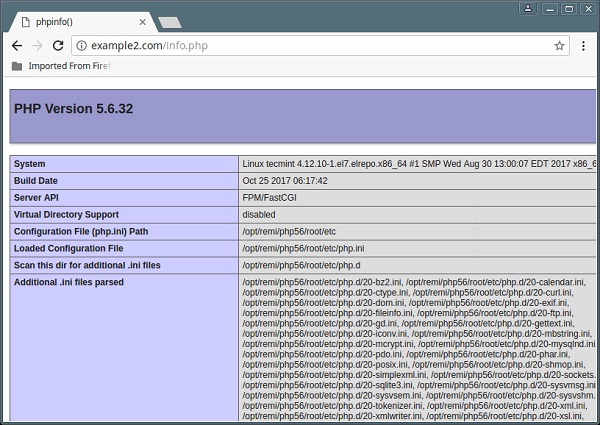
Congratulation! you have successfully setup two website on different PHP version.
If you find this tutorial helpful please share with your friends to keep it alive. For more helpful topic browse my website www.looklinux.com. To become an author at LookLinux Submit Article. Stay connected to Facebook.
Not working on a centos 7 nginx box. still loading 7.3 on both site. changed fastcgi_pass to serverip:9001 or localip:9001 for 5.6. still sites loading only 7.3 while 5.6 is also running